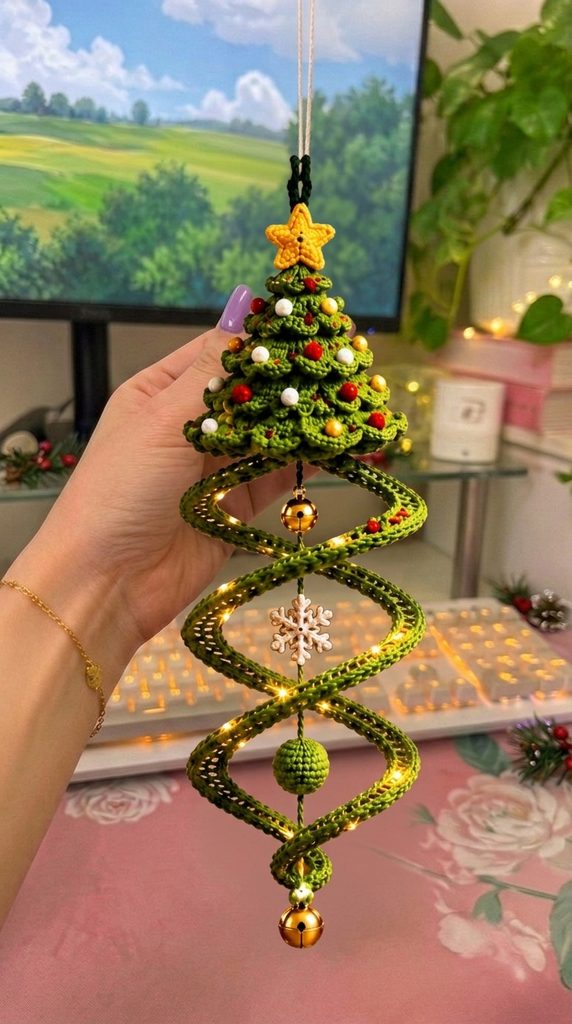
This crochet Christmas tree hanging pattern makes a ruffled cone tree studded with red, white and gold beads, topped with a gold star, sitting above an open green spiral that twists down through a jingle bell, a lace snowflake and a small green bauble to a second bell at the very bottom. The spiral is wire-cored, so it holds an open helix instead of collapsing.
The tree is built as a single cone worked from the point down, with a ruffled skirt round every few rounds to create the tiered branch effect. The beads are strung onto the yarn before you start and pushed into place as you crochet, which is a technique worth learning — it puts each bead exactly where you want it and it cannot fall off later.
Expect nine to eleven hours. Pre-stringing the beads takes a patient half hour on its own, the tree is a couple of sessions, and the spiral and assembly fill the rest. Good for someone comfortable with cone shaping who wants to try bead crochet and wire-cored construction.
Materials
- DK cotton yarn, mid green ~45 g — tree, spiral, bauble
- DK cotton yarn, golden yellow ~10 g — star
- DK cotton yarn, white ~8 g — snowflake
- 2.5 mm crochet hook firm fabric
- 1.75 mm crochet hook for the snowflake only
- Round beads, 4 mm ~30 red, ~25 white, ~25 gold — 80 total
- Gold jingle bells, 20 mm 2
- Green florist wire, 0.8 mm ~60 cm, for the spiral core
- Dark green cord or waxed thread ~40 cm, for the central hanging spine
- White or cream cotton cord, 2 mm ~40 cm hanging loop
- Battery micro LED fairy light wire, warm white optional, ~60 cm
- Polyester fiberfill ~15 g
- Fabric stiffener or sugar starch for blocking the snowflake
- Big-eye beading needle, tapestry needle, wire cutters, round-nose pliers
Abbreviations
MRmagic ringchchainsl stslip stitchscsingle crochetbscbead single crochet — slide a bead up close to the hook, then complete the sc so the bead sits on the fronthdchalf double crochetdcdouble crochettrtreble crochetpicotch 3, sl st into the first of those chainsinc2 sc in same stitchdecinvisible decrease over 2 stitchesBLOback loops onlyFLOfront loops onlyst(s)stitch(es)reprepeat( )stitch count at end of round[ ]repeat sequence as directedStringing the beads
- Thread a big-eye beading needle with the working end of the green yarn. Do not cut the yarn from the ball.
- String the beads in this order, remembering that the last one strung will be the first one crocheted: 20 beads for the bottom band, then 18, then 16, then 14, then 12 for the top band.
- Within each band, alternate the colours irregularly — roughly equal red, white and gold, but not in a repeating sequence. A strict red-white-gold repeat reads as a stripe rather than as scattered ornaments.
- Push all 80 beads well down the yarn, at least a metre, so they are out of the way while you work the beadless top rounds.
- Slide beads up one at a time as needed. Keep the rest pushed down — a cluster of beads riding up against the hook will distort your tension.
Tree cone — green (make 1)
- Worked from the point down. R1: 6 sc in MR. (6)
- R2: sc in each st. (6)
- R3: [sc 1, inc] rep 3 times. (9)
- R4: sc in each st. (9)
- R5: [sc 2, inc] rep 3 times. (12)
- R6: [sc 3, inc] rep 3 times. (15)
- R7: [sc 4, inc] rep 3 times. (18)
- R8 (bead round): [sc 2, bsc 1] rep 6 times, using 6 beads. (18)
- R9: [sc 5, inc] rep 3 times. (21)
- R10 (skirt round, FLO): working in front loops only, [sc 1, hdc 1, 2 dc in next st, hdc 1, sc 1] rep — work 2 dc in every 3rd st around, for 28 sts total. This creates the first branch ruffle. Do not count this round toward the cone. (28 skirt sts)
- R11: return to the back loops left free in R9 and sc in each of them. (21)
- R12: [sc 6, inc] rep 3 times. (24)
- R13 (bead round): [sc 3, bsc 1] rep 6 times, using 6 beads. (24)
- R14: [sc 7, inc] rep 3 times. (27)
- R15 (skirt round, FLO): as R10, working 2 dc in every 3rd st around for 36 skirt sts. (36 skirt sts)
- R16: return to the free back loops of R14 and sc in each. (27)
- R17: [sc 8, inc] rep 3 times. (30)
- R18 (bead round): [sc 3, bsc 1] rep — work a bead every 4th st around, using 7 beads. (30)
- R19: [sc 4, inc] rep 6 times. (36)
- R20 (skirt round, FLO): as before, 2 dc in every 3rd st, 48 skirt sts. (48 skirt sts)
- R21: return to the free back loops of R19 and sc in each. (36)
- R22: [sc 5, inc] rep 6 times. (42)
- R23 (bead round): work a bead every 4th st around, using 10 beads. (42)
- R24: [sc 6, inc] rep 6 times. (48)
- R25 (skirt round, FLO): 2 dc in every 3rd st, 64 skirt sts. (64 skirt sts)
- R26: return to the free back loops of R24 and sc in each. (48)
- R27: [sc 7, inc] rep 6 times. (54)
- R28 (bead round): work a bead every 4th st around, using 13 beads. (54)
- R29: [sc 8, inc] rep 6 times. (60)
- R30 (final skirt round, FLO): 2 dc in every 3rd st, 80 skirt sts. This is the widest branch tier. (80 skirt sts)
- R31: return to the free back loops of R29 and sc in each. Stuff the cone firmly now, keeping the point sharp. (60)
- R32: [sc 8, dec] rep 6 times. (54)
- R33: [sc 7, dec] rep 6 times. (48)
- R34: [sc 6, dec] rep 6 times. Top up the stuffing. (42)
- R35: [sc 5, dec] rep 6 times. (36)
- R36: [sc 4, dec] rep 6 times. (30)
- R37: [sc 3, dec] rep 6 times. (24)
- R38: [sc 2, dec] rep 6 times. (18)
- R39: [sc 1, dec] rep 6 times. (12)
- R40: dec 6 times. Fasten off, close the hole. This closed underside is where the spiral attaches. (6)
- Sew any remaining loose beads onto the flat cone surface between the skirt tiers, filling gaps where the scatter looks thin.
Star — gold (make 1)
- Panel. R1: 5 sc in MR. (5)
- R2: inc in each st. (10)
- R3: [sc 1, inc] rep 5 times. (15)
- R4: [sc 2, inc] rep 5 times. Fasten off. (20)
- Make a second panel; do not fasten off.
- Join: hold both panels together and sc 20 through both layers around, adding a pinch of fiberfill before closing. Sl st to join. (20)
- Points: sl st to the first st. In every 4th st, work: ch 5, sc in 2nd ch from hook, hdc 1, dc 1, tr 1, then sl st back into the same base st. Sl st across the next 3 sts and repeat. Fasten off after the fifth point. (5 points)
- Embroider a single small black French knot at the center front if you want the accent shown in the photo.
Snowflake — white (make 1)
- Use the 1.75 mm hook so the lace stays crisp and small.
- R1: ch 6, sl st to join into a ring. (6)
- R2: ch 1, 12 sc into the ring, sl st to join. (12)
- R3: ch 1, [sc 1, ch 5, skip 1 st] rep 6 times, sl st to join. (6 loops)
- R4 (arms): in each ch-5 loop work: ch 8, sc in 2nd ch from hook, hdc 1, dc 1, dc 1, then ch 3 and sl st into the 3rd ch from hook for a picot, then continue back down: dc 1, hdc 1, sc 1, sl st into the base loop.
- Before completing each arm, add a side branch: at the midpoint of the arm, ch 4, sl st into the 2nd ch from hook, sl st back to the arm, then repeat on the opposite side.
- Sl st across to the next ch-5 loop and repeat for all six arms. Fasten off. (6 arms)
- Block: soak in fabric stiffener or a heavy sugar-water solution, pin flat on a foam board with all six arms evenly spaced, and leave to dry completely. An unblocked snowflake curls and reads as a white blob.
Bauble — green (make 1)
- R1: 6 sc in MR. (6)
- R2: inc in each st. (12)
- R3: [sc 1, inc] rep 6 times. (18)
- R4: [sc 2, inc] rep 6 times. (24)
- R5-R9: sc in each st. (24)
- R10: [sc 2, dec] rep 6 times. (18)
- R11: [sc 1, dec] rep 6 times. Stuff firmly. (12)
- R12: dec 6 times. Fasten off, close the hole, leave a long tail top and bottom for threading onto the spine. (6)
Spiral — green, wire-cored (make 1)
- The wire is what holds the open helix shape. Without it this collapses.
- Cut a 55 cm length of florist wire. Turn a small closed loop at each end with round-nose pliers so no sharp point can work its way out.
- With green, ch 4, sl st to join into a ring. Lay the wire along the inside of the ring.
- Work sc around the wire continuously, in a spiral, enclosing the wire inside the tube: sc into each stitch of the previous round while keeping the wire running through the center. Aim for 4 sc per round.
- Continue for about 52 cm of covered wire, leaving the two end loops exposed. This takes a long time — settle in. Check every 10 cm that the wire has not slipped to one side of the tube.
- Fasten off and secure the yarn at the far end loop.
- Shape the helix: wind the covered wire around a bottle or jar about 6 cm in diameter, making three full turns, then slide it off. Stretch the coil out to about 20 cm and adjust each turn by hand until the three loops are evenly spaced.
- The wire holds whatever shape you set, so take your time here. It is the one part of this project you can adjust endlessly with no penalty.
Finishing
Cut a 35 cm length of dark green cord for the central spine. This runs straight down the middle of the helix and carries the hanging charms, while the wire spiral loops around it without touching. Knot a loop at the top end.
Sew the top loop of the spine to the underside of the tree cone, at the closed center point. Sew the top end loop of the wire spiral to the same spot, right beside it. Take at least a dozen stitches through both — this joint carries the entire lower half of the piece.
Thread the charms onto the spine in order from the top: the first jingle bell at 4 cm, the snowflake at 10 cm, the bauble at 16 cm, and the second jingle bell knotted at the very bottom at 22 cm. Knot the cord above and below each charm so nothing slides. Attach the bottom end loop of the wire spiral to the spine just above the final bell so the helix ends where the spine does.
Sew the star to the top point of the tree, angled slightly forward so it reads as sitting on the tip rather than growing out of the back. Fold the white cord in half, thread it through the top of the star or through the tree tip behind it, and knot into a hanging loop. If using the fairy lights, wind the wire loosely along the outside of the helix after everything else is done, and tuck the battery pack up behind the tree.
Hang the finished piece and let it settle. If the helix leans, bend the wire — that is what it is there for. Adjust until the three loops sit evenly around the spine.
Tips for Success
- String all the beads before starting and count them twice. Running out mid-round means cutting the yarn, restringing and joining, and the join always shows.
- Work each skirt round in front loops only and leave the back loops genuinely free. If you catch both loops, the ruffle sits flat against the cone and you lose the tiered branch look entirely.
- Push each bead through to the front of the fabric with your thumbnail as you complete the stitch. A bead left sitting inside the cone is invisible and you will not notice until the piece is stuffed.
- Shape the wire helix against a jar rather than freehand. Freehand coils come out with uneven loop spacing that is very hard to correct once you have handled the wire a few times and work-hardened it.
- Block the snowflake stiff. It hangs in open air with nothing supporting it, and an unstiffened one droops into an unrecognisable shape within a day.
Common Mistakes to Avoid
- Stringing the beads in the order you want to see them. Bead crochet works in reverse — the last bead strung is the first one used. String the bottom band first.
- Skipping the wire in the spiral because it seems like extra work. A yarn-only cord has no rigidity and the helix collapses into a limp tangle the moment you hang it. There is no substitute for the wire here.
- Understuffing the cone. The skirt rounds pull outward at five points along the cone, and a soft cone caves in between them. Stuff firmly and top up at rounds 31 and 34.
- Attaching the spiral and the spine at different points on the tree base. They must start from the same spot or the helix hangs at an angle to its own axis and the whole thing looks skewed.
- Leaving raw wire ends. They work through the yarn covering over time and will scratch. Turn a closed loop at both ends before you start covering.
Ways to Customize This Pattern
- Swap to a frosted palette — pale sage green tree with silver and clear beads, a white spiral and silver bells instead of gold.
- Skip the beads entirely and work the tree plain, then add tiny crocheted baubles: 6 sc in a magic ring, one round even, then dec to close, in red and gold, sewn onto the skirt tiers.
- Shorten the spiral to one and a half turns on a 30 cm wire and hang only a single bell, for a car mirror version at about half the drop.
- Replace the snowflake with a second, smaller star worked through R3 only with ch-4 points, if lace is not something you want to tackle.
- Make it a table piece rather than a hanger by mounting the bottom of the spiral into a small crocheted weighted base — a 24-stitch flat disc with a wrapped stone or washer inside.
Frequently asked questions
Can I sew the beads on afterwards instead of crocheting them in?
You can, and it avoids the pre-stringing entirely. Use strong sewing thread rather than yarn, take two passes through each bead, and anchor with a backstitch every third bead so one broken thread does not lose a whole cluster. The look is slightly different — sewn beads sit proud of the surface, crocheted ones nestle into it — but at this scale most people will not notice.
My skirt ruffles are curling under instead of flaring out. Why?
Not enough increase in the skirt round. Two double crochets in every third stitch gives roughly a third more stitches than the base round, which is the minimum for a visible flare. If yours still curls, go to 2 dc in every second stitch on the lower, wider tiers where more flare looks right anyway.
How do I crochet around wire without it kinking?
Keep the wire straight and under gentle tension with your non-hook hand, feeding it through the tube rather than pulling the crochet over it. Do not bend the wire while you are working — all shaping happens after the covering is complete. If it does kink, straighten it by running it between your thumb and a wooden spoon handle before you shape the helix.
Is the wire safe around children or pets?
With closed loops at both ends and a full yarn covering, it is reasonably safe hung out of reach, but this piece is not a toy. It has small beads, a wire core and jingle bells with removable clappers. Hang it high, and if that is not possible, make the table-mounted version instead so it is not something a child can pull down.
Leave a Reply