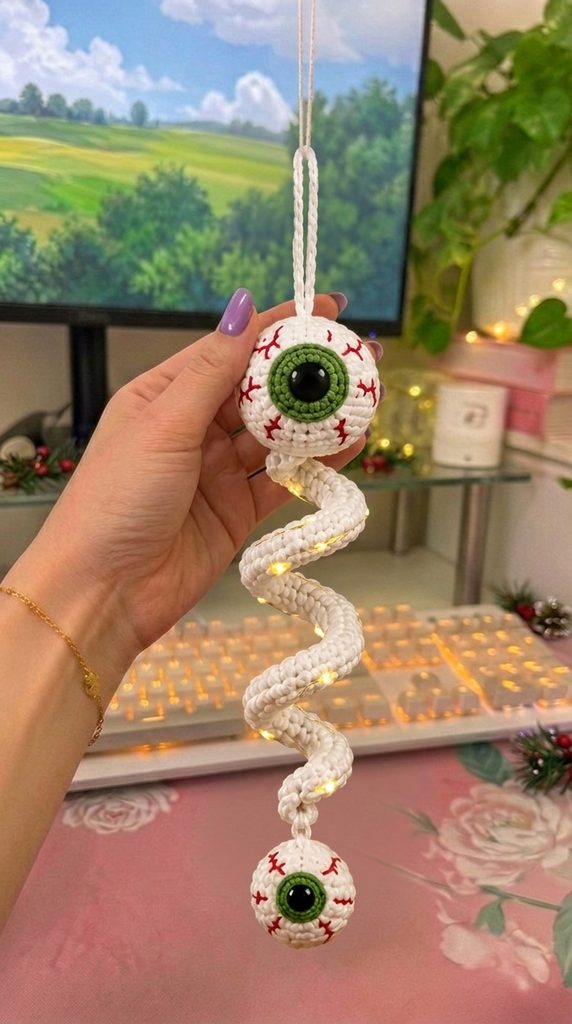
This crochet eyeball Halloween ornament pattern makes a hanging pair of bloodshot eyes — a large one at the top and a smaller one dangling below — connected by a long white spiral that reads as a twisted optic nerve. The irises are worked as separate flat discs in mossy green and sewn on, with black safety eyes set into their centers as pupils.
The bloodshot veins are the detail that makes or breaks it. They are surface-embroidered in red floss as branching lines radiating in from the edge of the sphere toward the iris, and doing them well means committing to irregular, uneven branches rather than neat symmetrical ones. Real veins are messy, and messy is what looks convincing here.
Expect five to seven hours. The spheres go fast, the spiral is a long stretch of slip stitch cord, and most of the fiddly time is in the vein embroidery and getting both eyes to look like a matched pair. Good for someone with a few amigurumi finished who wants to practice surface embroidery and appliqué on a curved surface.
Materials
- DK cotton yarn, bright white ~50 g — both eyeballs and the spiral
- DK cotton yarn, mossy green ~10 g — irises
- 2.5 mm crochet hook tight, so no stuffing shows through
- Black safety eyes, 14 mm 1, for the large eye pupil
- Black safety eyes, 10 mm 1, for the small eye pupil
- Red embroidery floss 6-strand, for the veins — use 2 strands
- Polyester fiberfill ~20 g
- White or cream cotton cord, 2 mm ~40 cm hanging loop
- Battery micro LED fairy light wire, warm white optional, ~50 cm, woven through the spiral
- Tapestry needle and embroidery needle
- Stitch markers
Abbreviations
MRmagic ringchchainsl stslip stitchscsingle crochethdchalf double crochetinc2 sc in same stitchdecinvisible decrease over 2 stitchesst(s)stitch(es)reprepeat( )stitch count at end of round[ ]repeat sequence as directedLarge eyeball — white (make 1)
- R1: 6 sc in MR. (6)
- R2: inc in each st. (12)
- R3: [sc 1, inc] rep 6 times. (18)
- R4: [sc 2, inc] rep 6 times. (24)
- R5: [sc 3, inc] rep 6 times. (30)
- R6: [sc 4, inc] rep 6 times. (36)
- R7: [sc 5, inc] rep 6 times. (42)
- R8-R15: sc in each st. (42)
- R16: [sc 5, dec] rep 6 times. (36)
- R17: [sc 4, dec] rep 6 times. (30)
- R18: [sc 3, dec] rep 6 times. (24)
- Pause here. Attach the iris now, following the Iris section below, and set the safety eye through both iris and sphere. Then continue.
- R19: [sc 2, dec] rep 6 times. Begin stuffing firmly. (18)
- R20: [sc 1, dec] rep 6 times. Finish stuffing — the sphere should be very firm and hold a round shape with no dents. (12)
- R21: dec 6 times. (6)
- Fasten off, close the remaining hole with the yarn tail, weave in. (6)
Small eyeball — white (make 1)
- R1: 6 sc in MR. (6)
- R2: inc in each st. (12)
- R3: [sc 1, inc] rep 6 times. (18)
- R4: [sc 2, inc] rep 6 times. (24)
- R5: [sc 3, inc] rep 6 times. (30)
- R6-R11: sc in each st. (30)
- R12: [sc 3, dec] rep 6 times. (24)
- R13: [sc 2, dec] rep 6 times. (18)
- Pause here. Attach the small iris and set the 10 mm safety eye through both layers before continuing.
- R14: [sc 1, dec] rep 6 times. Stuff firmly. (12)
- R15: dec 6 times. (6)
- Fasten off, close the hole, weave in. (6)
Iris — mossy green (make 1 large, 1 small)
- Large iris. R1: 6 sc in MR. (6)
- R2: inc in each st. (12)
- R3: [sc 1, inc] rep 6 times. (18)
- R4: [sc 2, inc] rep 6 times. (24)
- R5: sc in BLO in each st around — this back-loop round makes the iris cup slightly, so it sits against the curve of the sphere instead of standing proud of it. Sl st to join, fasten off leaving a 30 cm tail. (24)
- Small iris. R1: 6 sc in MR. (6)
- R2: inc in each st. (12)
- R3: [sc 1, inc] rep 6 times. (18)
- R4: sc in BLO in each st around, sl st to join, fasten off leaving a 25 cm tail. (18)
- Punch the safety eye post through the exact center of the iris — through the magic ring hole, widening it gently with a knitting needle if needed. Do not attach the washer yet.
Attaching the iris
- With the sphere still open at round 18 (or round 13 for the small eye), position the iris on the front face, centered between the sphere’s widest rounds. It should sit on the equator, not near the top or bottom.
- Push the safety eye post through the crochet fabric of the sphere, working it between two stitches rather than splitting a stitch.
- Reach inside the open sphere and press the washer onto the post until it clicks fully home. Test by tugging the iris firmly — it should not shift at all.
- Now sew the outer edge of the iris to the sphere with the green tail, using small whip stitches into every stitch around the iris edge. Twenty-four stitches for the large, eighteen for the small.
- Sew tightly enough that the iris edge disappears into the white surface. A visible gap under the iris rim is the single thing that most makes a crochet eyeball look like a crochet circle glued to a ball.
- Bury the remaining green tail inside the sphere and continue the decrease rounds.
Bloodshot vein embroidery
- Do this after the sphere is fully closed and stuffed. A firm surface is much easier to embroider on than a floppy one.
- Thread the embroidery needle with 2 strands of red floss. Knot the end and bury the knot by entering the sphere at the back and coming out where you want a vein to begin.
- Each vein is a main line of 2-3 straight stitches running from near the outer edge of the sphere in toward the iris, stopping about 5 mm short of the iris rim.
- From the main line, branch off 2-3 shorter stitches at irregular angles, each 4-8 mm long. Let the branches be different lengths and angles on every vein — matching branches read as decorative, not anatomical.
- Large eye: work 8-10 veins spaced unevenly around the iris. Leave one quadrant noticeably sparser than the others. Real eyes are not evenly bloodshot.
- Small eye: work 5-6 veins, scaled shorter to suit the smaller sphere.
- Do not carry the floss across the surface between veins. Pass it through the inside of the sphere instead, or the carried strand shows as a pink shadow under the white.
- Finish by burying the tail inside the sphere and snipping close.
Spiral nerve cord — white (make 1)
- The spiral is a long cord that coils itself because the outer edge has more stitches than the inner one.
- With white, ch 91.
- Row 1: sc in the 2nd ch from hook and in each ch across, turn. (90)
- Row 2: ch 1, work 2 hdc in each st across. Do not turn, do not straighten the work. The strip will begin corkscrewing within the first ten stitches. Let it. (180)
- Row 3 (edge): ch 1, sc in each st across. Work this row loosely — a tight edge round strangles the coil into a rigid corkscrew instead of a soft spiral. Fasten off, leave a 20 cm tail at each end. (180)
- The finished coil should have 5-6 full turns and hang about 18-20 cm. Count by tens rather than trying to count the whole coil at once: mark every 20 stitches during row 2.
- If the coil is too loose, run a doubled strand of white yarn down the center of the spiral from top to bottom and tack it lightly at four points, pulling to gather the coil to the length you want.
- Steam-set if needed: hold the coil over a steaming kettle for thirty seconds, shape it with your fingers, and let it dry hanging with a light weight at the bottom. Do not press with an iron.
Hanging loop cord — white (make 1)
- With white, ch 61.
- Row 1: sl st in the 2nd ch from hook and in each ch across. Do not turn. (60)
- Row 2: rotate 180 degrees and sl st into the free back bump of each chain, back to the start. Fasten off, leave long tails. (60)
- Fold in half to make a doubled loop about 12 cm long. The doubled cord keeps its shape rather than twisting, which matters because it is the most visible part of the hanger.
Finishing
Sew the top of the spiral to the bottom of the large eyeball, directly opposite the iris so the eye faces forward while the spiral hangs straight down. Use twelve or more small stitches around the spiral’s end so the joint cannot pivot — this seam carries the weight of the entire lower half, and a weak one lets the small eye swing off-center.
Sew the bottom of the spiral to the top of the small eyeball the same way, again opposite its iris. Check before you stitch that both irises are facing the same direction. It is easy to attach the second eye a quarter turn out, and the piece looks wrong in a way that is hard to place until you notice one eye is looking sideways.
Sew the folded hanging cord to the top of the large eyeball, at the point directly opposite where the spiral attaches. Knot the loop closed and bury the ends inside the sphere.
If you are using the fairy lights, weave the wire through the center of the spiral coil after everything is assembled, tucking the battery pack up behind the large eyeball where the hanging cord attaches. Wind the wire loosely — a tight wind pulls the coil out of shape and the bulbs end up all facing inward. Hang the finished piece and let it settle for a minute so the spiral opens out under the weight of the small eye.
Tips for Success
- Stuff both spheres harder than feels comfortable. An understuffed eyeball dents where the spiral pulls on it, and the vein embroidery puckers. It should feel like a firm rubber ball.
- Embroider the veins on the large eye first, then use it as a reference while doing the small one. Working from a finished example keeps the two reading as a matched pair without making them identical.
- Count row 2 of the spiral in blocks of twenty and mark each block. Two hundred and forty stitches into a coiling strip is very easy to lose count of, and one missed increase shows as a flat spot in the coil.
- Check the iris placement against the sphere’s equator before setting the safety eye. Set too high, the eye looks startled; too low, it looks half-closed. Neither is fixable afterward.
- Use cotton, not acrylic. Acrylic has no memory and the spiral relaxes into a limp ribbon within a week of hanging.
Common Mistakes to Avoid
- Sewing the iris on after the sphere is closed. Without a safety eye set through both layers, the iris shifts under the sewing tension and ends up crooked. Attach and secure it while the sphere is still open.
- Making the veins symmetrical and evenly spaced. Neat radiating lines look like a decorative sunburst. Irregular, branching, unevenly clustered lines look like veins. Leave gaps deliberately.
- Carrying red floss across the outside of the white sphere between veins. It shows through as a pink smear. Always pass the floss back through the inside.
- Working the spiral’s edge round tightly. It fights the coil and produces a stiff corkscrew that will not relax. Go up half a hook size for that round only if yours is pulling.
- Attaching the spiral to the side of the eyeball rather than the bottom. The eye then hangs tilted and stares at the floor. Attach directly opposite the iris.
Ways to Customize This Pattern
- Change the iris colour — icy blue, amber, or deep brown all work. For a demonic version, use red irises with black veins instead of red.
- Add a third, smallest eyeball midway down the spiral by sewing it directly onto the coil. Work it through round 4 of the small eye pattern (24 sts) with a 6 mm safety eye.
- Make it a car mirror hanger by shortening the spiral to ch 61 for row 1 and scaling both eyes down one size — the large eye becomes the small eye pattern and the small becomes a 24-stitch version.
- Turn it into a garland by making four or five large eyeballs and joining them along a single straight cord with short spiral segments between each pair.
- Skip the veins entirely and work the spheres in glow-in-the-dark yarn for a subtler piece that only reads as eyes once the lights go off.
Frequently asked questions
My spiral barely twists. What went wrong?
Almost always the row 2 increase. You need 2 hdc in every single stitch — 180 from 90. If you worked some stitches without an increase, or used sc instead of hdc, there is not enough excess fabric to force the coil. Count one section: twenty base stitches should produce forty hdc.
Can I embroider the pupil instead of using safety eyes?
Yes, and it is the safer choice if this is going anywhere near a small child. Work a solid circle of black satin stitch in the center of the green iris before sewing the iris to the sphere, using 6 strands of floss so the coverage is dense. It will not have the glossy highlight of a plastic eye, so add two or three tiny white stitches at the upper left of the pupil to fake the shine.
The white yarn is showing grey where I handled it. How do I keep it clean?
Cotton picks up oil from your hands over a long project. Wash your hands before each session, keep the finished spheres in a bag between sessions, and do the vein embroidery last so the white gets the least handling. If it has already dulled, a gentle hand wash in cool water with a drop of mild detergent and a flat dry will bring most of it back — do not tumble dry, as the spiral will lose its coil.
Are the fairy lights safe to leave inside the spiral long term?
Micro LED wire runs cool and is fine against cotton, but the battery pack should not be left switched on unattended for long periods, and it needs to be removable so you can change batteries. Tuck it into a small crocheted pouch behind the large eyeball rather than sewing it in permanently.
Leave a Reply