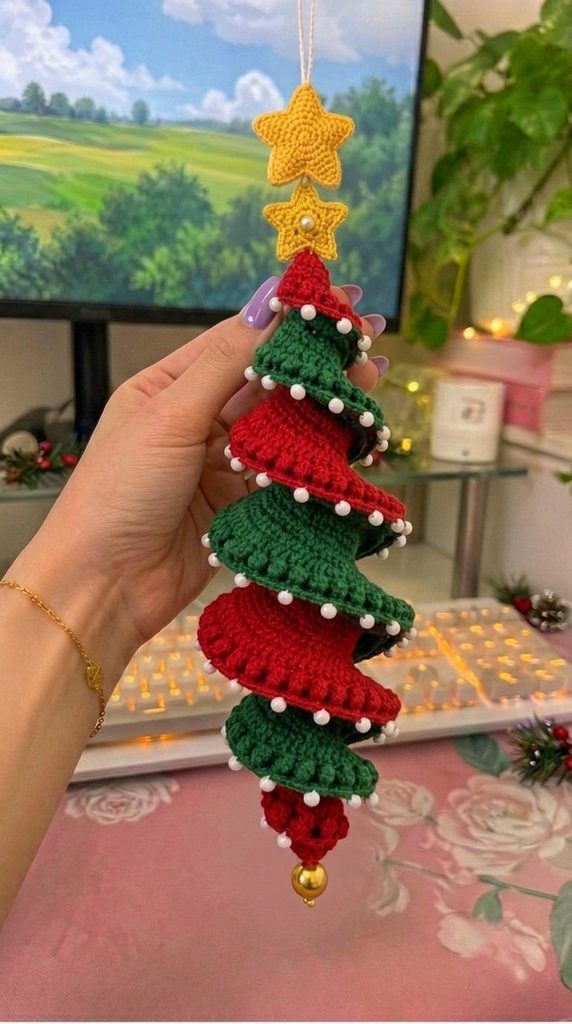
This crochet Christmas tree ornament pattern makes a spiral tree built from six separate ruffled tiers, alternating red and green, threaded onto a firm central cord so each one sits a little wider than the one above it. Every tier edge is trimmed with white pearl beads, and the whole thing is topped with two gold stars and finished with a gold bead drop.
The ruffle is what does the work here. Each tier is a flat round worked with a deliberate over-increase, so the fabric has more stitches than the circumference can hold and buckles into a wave on its own. Getting that buckle even, and getting the six tiers to stack at a consistent rotation, is the whole skill of the piece.
Expect eight to ten hours. The tiers themselves are quick — under half an hour each — and the time goes into the pearl trim and the assembly. Good for someone who has made a few ornaments and wants to try ruffled shaping and stacked assembly rather than standard stuffed rounds.
Materials
- DK cotton yarn, deep green ~35 g — three tiers and the cord
- DK cotton yarn, Christmas red ~35 g — three tiers and the finial
- DK cotton yarn, golden yellow ~12 g — two stars
- 2.5 mm crochet hook firm fabric, no gaps
- White pearl beads, 6 mm ~70, half-drilled or fully drilled
- Gold metal or acrylic bead, 14 mm 1, bottom drop
- Gold pearl bead, 6 mm 1, center of the lower star
- Gold headpin or short wire 1, for the bottom bead
- White or cream cotton cord, 2 mm ~40 cm hanging loop
- Strong white sewing thread for attaching pearls
- Beading needle and tapestry needle
- Small amount of polyester fiberfill ~5 g, finial only
- Stitch markers at least 6
Abbreviations
MRmagic ringchchainsl stslip stitchscsingle crochethdchalf double crochetdcdouble crochettrtreble crochetinc2 sc in same stitchdecinvisible decrease over 2 stitchesBLOback loops onlyst(s)stitch(es)reprepeat( )stitch count at end of round[ ]repeat sequence as directedTier 1 — smallest, green (make 1)
- R1: 6 sc in MR. (6)
- R2: inc in each st. (12)
- R3: [sc 1, inc] rep 6 times. (18)
- R4: [sc 2, inc] rep 6 times. (24)
- R5: [sc 3, inc] rep 6 times. (30)
- R6 (ruffle round): 2 hdc in each st around. The fabric will begin to wave here. Do not flatten it. (60)
- R7 (edge round): sc in each st around, sl st to join. Fasten off, leave a 20 cm tail. (60)
- Mark the center of the magic ring with a stitch marker — this is where the cord passes through.
Tier 2 — red (make 1)
- R1: 6 sc in MR. (6)
- R2: inc in each st. (12)
- R3: [sc 1, inc] rep 6 times. (18)
- R4: [sc 2, inc] rep 6 times. (24)
- R5: [sc 3, inc] rep 6 times. (30)
- R6: [sc 4, inc] rep 6 times. (36)
- R7 (ruffle round): 2 hdc in each st around. (72)
- R8 (edge round): sc in each st around, sl st to join. Fasten off, leave a 20 cm tail. (72)
Tier 3 — green (make 1)
- R1: 6 sc in MR. (6)
- R2: inc in each st. (12)
- R3: [sc 1, inc] rep 6 times. (18)
- R4: [sc 2, inc] rep 6 times. (24)
- R5: [sc 3, inc] rep 6 times. (30)
- R6: [sc 4, inc] rep 6 times. (36)
- R7: [sc 5, inc] rep 6 times. (42)
- R8 (ruffle round): 2 hdc in each st around. (84)
- R9 (edge round): sc in each st around, sl st to join. Fasten off, leave a 20 cm tail. (84)
Tier 4 — red (make 1)
- R1: 6 sc in MR. (6)
- R2: inc in each st. (12)
- R3: [sc 1, inc] rep 6 times. (18)
- R4: [sc 2, inc] rep 6 times. (24)
- R5: [sc 3, inc] rep 6 times. (30)
- R6: [sc 4, inc] rep 6 times. (36)
- R7: [sc 5, inc] rep 6 times. (42)
- R8: [sc 6, inc] rep 6 times. (48)
- R9 (ruffle round): 2 hdc in each st around. (96)
- R10 (edge round): sc in each st around, sl st to join. Fasten off, leave a 20 cm tail. (96)
Tier 5 — green (make 1)
- R1: 6 sc in MR. (6)
- R2: inc in each st. (12)
- R3: [sc 1, inc] rep 6 times. (18)
- R4: [sc 2, inc] rep 6 times. (24)
- R5: [sc 3, inc] rep 6 times. (30)
- R6: [sc 4, inc] rep 6 times. (36)
- R7: [sc 5, inc] rep 6 times. (42)
- R8: [sc 6, inc] rep 6 times. (48)
- R9: [sc 7, inc] rep 6 times. (54)
- R10 (ruffle round): 2 hdc in each st around. (108)
- R11 (edge round): sc in each st around, sl st to join. Fasten off, leave a 20 cm tail. (108)
Tier 6 — largest, green (make 1)
- R1: 6 sc in MR. (6)
- R2: inc in each st. (12)
- R3: [sc 1, inc] rep 6 times. (18)
- R4: [sc 2, inc] rep 6 times. (24)
- R5: [sc 3, inc] rep 6 times. (30)
- R6: [sc 4, inc] rep 6 times. (36)
- R7: [sc 5, inc] rep 6 times. (42)
- R8: [sc 6, inc] rep 6 times. (48)
- R9: [sc 7, inc] rep 6 times. (54)
- R10: [sc 8, inc] rep 6 times. (60)
- R11 (ruffle round): 2 hdc in each st around. (120)
- R12 (edge round): sc in each st around, sl st to join. Fasten off, leave a 20 cm tail. (120)
Top cone — red (make 1)
- This is the pointed red tip that sits above tier 1 and meets the stars.
- R1: 6 sc in MR. (6)
- R2: sc in each st. (6)
- R3: [sc 2, inc] rep 2 times. (8)
- R4: sc in each st. (8)
- R5: [sc 3, inc] rep 2 times. (10)
- R6: sc in each st. (10)
- R7: [sc 4, inc] rep 2 times. (12)
- R8: sc in each st. (12)
- R9: [sc 1, inc] rep 6 times. (18)
- R10: sc in each st. Stuff firmly now — the point must stay sharp. (18)
- R11: [sc 2, inc] rep 6 times. Fasten off, leave a long tail. (24)
Bottom finial — red (make 1)
- The downward-pointing red teardrop below tier 6, from which the gold bead hangs.
- R1: 6 sc in MR. (6)
- R2: inc in each st. (12)
- R3: [sc 1, inc] rep 6 times. (18)
- R4: [sc 2, inc] rep 6 times. (24)
- R5-R7: sc in each st. (24)
- R8: [sc 2, dec] rep 6 times. (18)
- R9: [sc 1, dec] rep 6 times. Stuff firmly. (12)
- R10: dec 6 times. (6)
- R11: dec 3 times. Fasten off, close the hole, leave a long tail. (3)
Stars — gold (make 2, one slightly larger)
- Large star, front and back panels. Panel: R1: 5 sc in MR. (5)
- R2: inc in each st. (10)
- R3: [sc 1, inc] rep 5 times. (15)
- R4: [sc 2, inc] rep 5 times. (20)
- R5: [sc 3, inc] rep 5 times. Fasten off on the first panel; do not fasten off the second. (25)
- Hold both panels together and sc 25 through both layers around the edge, adding a pinch of fiberfill before closing. Sl st to join. (25)
- Points: sl st to the first st. In every 5th st, work: ch 6, sc in 2nd ch from hook, hdc 1, dc 1, tr 1, tr 1, then sl st back into the same base st. Sl st across the next 4 sts and repeat. Fasten off after the fifth point.
- Small star: work both panels through R4 only (20 sts), join the same way, and work the five points with ch 5 instead of ch 6 — sc, hdc, dc, tr.
- Sew the small gold pearl bead to the center of the small star.
Central cord — green (make 1)
- The cord holds the six tiers at fixed spacing, so it must be stiff. Work tightly.
- With green, ch 46.
- Row 1: sl st in the 2nd ch from hook and in each ch across. Do not turn. (45)
- Row 2: rotate 180 degrees and sl st into the free back bump of each chain, back to the start. (45)
- Fasten off, leaving a 30 cm tail at each end. Finished length about 18 cm.
- If the cord bends under its own weight, thread a doubled strand of green yarn through its center from end to end and knot both ends under light tension.
Pearl trim
- Do this on each tier while it is still separate and easy to turn. Once the tree is assembled, the inner edges are hard to reach.
- Thread the beading needle with doubled white sewing thread and knot the end.
- Bring the needle up through the outer edge round of the tier, thread one pearl, and pass back down through the adjacent stitch so the pearl sits on the very rim, not on the flat surface.
- Space the pearls about 6 stitches apart around each tier. That works out to roughly 10 pearls on tier 1, 12 on tier 2, 14 on tier 3, 16 on tier 4, 18 on tier 5 and 20 on tier 6.
- Carry the thread along the inside of the ruffle between pearls rather than cutting and reknotting for each one, but anchor with a small backstitch every third pearl so one broken thread cannot lose the whole round.
- Place a pearl at each crest of the ruffle wave rather than in the troughs. On the crests they catch the light; in the troughs they disappear.
Finishing
Mark the cord with stitch markers before threading anything: the first at 1 cm from the top, then five more at 3 cm intervals. Even spacing is the difference between a tree and a lumpy stack, and it cannot be corrected once everything is sewn.
Thread each tier onto the cord through the center of its magic ring, smallest first, working down. At each marker, sew the tier’s center securely to the cord using the tail you left, taking 6-8 small stitches all the way around the magic ring opening. Pull each one snug — a loose center lets the tier slide and tilt.
The spiral comes from rotation. Set tier 1 with one ruffle crest pointing directly toward you, then rotate each tier below it 60 degrees clockwise from the one above. After six tiers you have made one full turn, which is what gives the piece its twist. If eyeballing 60 degrees feels unreliable, cut a small card circle, mark six points evenly around it, and slide it along the cord as a guide.
Sew the red top cone over the top of tier 1, covering the cord end, with the point facing up. Sew the red finial to the underside of tier 6, point facing down. Thread the gold bead onto the headpin, turn a loop, and attach it to the tip of the finial. Sew the small star above the cone, then the large star above that, both facing forward. Fold the white cord in half, thread it through the top point of the large star, and knot into a hanging loop. Hang the tree and let it settle — the bead’s weight pulls everything into line and opens the spiral out.
Tips for Success
- Make all six tiers before assembling any of them. Working the same increase pattern six times in a row evens out your tension across the set, and tiers made on different days come out visibly different.
- Use hdc for the ruffle round, not dc. Double crochet gives a ruffle so deep and floppy that the tiers merge into each other and the tree loses its outline. Half double is the sweet spot.
- Work the ruffle and edge rounds a touch looser than the flat rounds. A tight ruffle round fights itself and produces hard creases rather than soft waves.
- Attach the pearls before assembly, and count them per tier as you go. Reaching between two assembled ruffles with a beading needle is much harder than it sounds.
- Test-hang after three tiers. If the cord is already bowing or the rotation is drifting, fixing three attachments is far easier than six.
Common Mistakes to Avoid
- Flattening the ruffle rounds by blocking or pressing. The wave is the design. Blocked flat, the tiers become plain discs and the tree reads as a stack of coasters.
- Skipping increases in the ruffle round because the fabric is buckling. That buckle is the point — 2 hdc in every single stitch, no exceptions, right around.
- Sewing the tiers to the cord with only two or three anchor stitches. The tier pivots and hangs crooked. Stitch all the way around the magic ring opening.
- Placing the pearls on the flat face of each tier instead of on the rim. On the face they are half-hidden by the ruffle above; on the rim they outline the silhouette, which is what the photo effect depends on.
- Using a plain single chain for the central cord. It has no rigidity and the tiers collapse into each other. The double-worked slip stitch cord, cored if necessary, is what holds the tree upright.
Ways to Customize This Pattern
- Work all six tiers in green for a traditional tree, and use red pearls or small red beads for the trim instead of white so the ornament colour still reads at a distance.
- Go icy — white and pale silver-grey tiers with clear glass beads and a silver star. Same construction, completely different piece.
- Add a seventh and eighth tier by continuing the increase pattern to 66 and 72 stitches before the ruffle round, and lengthen the cord to ch 58. This gives a taller, more tapered tree.
- Shrink it into a set of small tree ornaments by making only three tiers each, using tiers 1, 2 and 3, on a 9 cm cord. A set of three or four looks good on a garland.
- Swap the gold bead drop for a small crocheted red bauble: 6 sc in a magic ring, increase to 18 over three rounds, three rounds even, then decrease to close, stuffed firmly.
Frequently asked questions
My tiers are ruffling so much they look frilly rather than tree-shaped. How do I calm them down?
Your ruffle round is probably worked in dc, or your hdc are unusually tall. Rework the ruffle round in hdc at a slightly tighter tension, or reduce it to [sc 1, 2 hdc in next st] around, which gives one and a half times the stitches instead of double. That produces a gentler wave that still separates the tiers.
Can I make this without the central cord, by joining each tier directly to the one above?
You can, and it uses less yarn, but you lose control of the spacing. Tiers joined directly tend to compress under their own weight and the tree gets shorter and denser as it hangs. If you do go this route, sew the tiers together at four points rather than one, and keep a 3 cm gap by working a short chain spacer between each pair.
How many pearls do I actually need?
Around 70 at the spacing given, plus a few spares — pearls split when a needle goes through the drill hole at an angle. If you want a denser look, space them 4 stitches apart instead of 6, which takes it up to about 105. Do not go closer than 4 stitches; the pearls start touching and the rim looks solid white rather than dotted.
Will this hold its shape stored in a box for a year?
Cotton holds the ruffle well, but pressure flattens it. Store it hanging if you can, or in a box tall enough that nothing rests on top of it. If it does come out compressed, hang it in a steamy bathroom for twenty minutes and finger-shape the ruffles as they dry — do not iron it.
Leave a Reply